Week 20: Frank talk

Family first!

Family first!

This week’s post was supposed to be about brioche knitting, but… I think it’s time to admit that my knitting challenge doesn’t proceed as I’d love it to. I broke the deadlines more than once. I skipped the homework. I felt guilty about both…

Did I tell you about perfectionism? Well, being a new mum does make you lower the bar but I still like to do things properly and unfortunately, at this point, I realise that it’s impossible for me to combine the 24-hour baby-sitting “job” and the full-day wife’s “job” with anything as regular as a weekly knitting challenge.

I absolutely enjoy my life. I have a wonderful family. And this wonderful family needs a lot of attention. So, sorry as I am, I must call this year’s knitting challenge closed.

Of course, I won’t stop knitting altogether – I’ll go on enjoying it, but on a less scheduled basis. Stay with me for updates!

Good knitting to all of you!

Iryna

Week 19: Mitered knitting

w19Mitered knitting is yet another form of modular knitting. If you have ever seen an afgan, chances are, you have already seen what a mitered square looks like. If not, here’s an example:

Not bad, hein?

The good news is, it’s very easy to knit and the number of stitches decreases as you progress!

Here’s a video tutorial from the Creative Knitting magazine showing you all you need to know:

And here are a couple of free patterns: the blanket you see above (from chocolateachuva.blogspot.com), a mitered scarf from DROPS and why not a pair of mitered socks (by Monika Steinbauer)?

Got leftover yarn? You know what you have to do!

Weeks 17-18

w17 w18Well… Week 17 was spent cleaning our place ans week 18 – receiving family… My in-laws proved to be very efficient as baby-sitters and one might think I’d have more knitting time but in fact I had close to none – I suppose it was all “eaten up” by the increased cooking hours… No knitting – no new techniques… Sorry!

Week 16: Seamless crochet

w16I’ve been hesitating whether to post this video because it’s in Russian but, after all, this is my blog! Besides, the technique itself is a real treasure for someone who, like myself, loves the look of crocheted motifs but hates the idea of having to sew them together. Let’s say, you want to crochet something like this:

The usual way is to begin every flower at the centre (yarn tail 1) and cut the yarn once you’ve finished it (yarn tail 2), which leaves you way too many yarn tails… Now, some clever person has found a way to remedy for that: you start the first flower (yarn tail 1) and cut the yarn (yarn tail 2) once you’ve finished the project! Just two yarn tails! Well, provided you don’t change yarn colour…

All right, here is the video tutorial. As I’ve said, it’s in Russian but if you can crochet, you’ll understand how it works! I actually watched it with the sound cut off because my baby was sleeping…

Part One: http://pinterest.com/pin/568298046698965220


Part Two: http://pinterest.com/pin/568298046699003303


And here’s the pattern for the scarf I used as illustration above!

Week 13: Selvedges

w13This week we’re going to explore selvedge (or selvage if you prefer) stitches. The reason of this choice is simple: I’m back to designing and I need the best, neatest and most pick-up-and-knit-friendly selvedge ever!

Speaking about design… I know I never really stopped “improvising” baby clothes but this time I’m up to something big, as big as half a sweater, adult size! I’ve already knitted a swatch – which is rare – and I’ve totally enjoyed it – which is even more rare! My hands are itching to start knitting but before I cast on, I need to persuade my baby boy to fall asleep so I can do my math… Wish me luck!

Yes I know I’m hopelessly late… But not with my knitting! I have cast on an intimidating total of 366 stitches and my big mysterious project is moving on!

All right, now to selvedges: instead of repeating what others have written, I give you a link to a very good post from tessknits.com: here you go!

As to my question (which selvedge will suit me better), the answer is – none! That is, no selvedge, both the first and the last stitches should be worked in the main pattern (reverse stockinette) – this will provide me with a denser edge without bumps – just what I need!

Hope you enjoy your knitting as I do!


Week 12: Neckerchiefs!

w12Lots of neckerchiefs!

My baby is a champion drooler, which results in his wearing bibs all the time. Almost all his pictures feature a bib hanging around his neck so he always looks as if he were ready for a meal… Besides, the big feeding bibs completely cover his cute clothes and now that he’s beginning to eat solids the bibs are beginning to look too messy. You see why we need neckerchiefs! So, this is what I’m going to knit this week: a whole lot of them!

And here they are – one for every day of the week!

neckerchiefs-1

Week 11: Double rolled and shagged knitting (and thrumming)

w11With -12 Celsius last night, one is more likely to think about toasty mittens rather than sleeveless tanks… Hence this week’s topic! Both double rolling and shagging are used to create a lining adding an extra layer of warmth to socks, mittens etc. The first technique uses an additional thread (roving is the best choice but I think any bulky single-spun yarn will do) and the padded lining is created while knitting. The second is worked in two steps: first an item is knitted in a specific kind of ribbing to prepare the base for shagging and then a padding is added with the help of a sewing needle.

Here’s a picture of a double rolled mitten:

And here is what the inside of a shagged sole sock looks like:

Image source: Dawn Brocco via http://www.craftsy.com

You can find the directions for double-rolled knitting here and here (pp 36-45) and there’s a description of a sewn shag on p. 46 of the same book. The source for both is Favorite Mittens: Best Traditional Mitten Patterns from Fox & Geese & Fences by Robin Hansen. This part of the book is published on Google Books and is accessible to everyone so there’s no copyright breaking involved.

And while we are talking about warmth, there’s one more technique that can provide a similar result – thrumming. Here’s a thrummed mitten:

And here is a tutorial (based on the same book as I can see).

Now you have no excuse for having cold hands or feet!

Week 10: Loop Stitch

w10Let’s continue with fun stitches! If any, loop stitch (or fur stitch) definitely falls into this category. I know few people who would wear a “furry” hat or pullover but a loopy cosy, a rug or a toy look like a perfect project for this stitch. And hey, isn’t it just fun?

Image source: stitchywitches.blogspot.com

You won’t believe it but I actually began doing my homework today!

Here is how you knit the loop stitch:

http://www.knittinghelp.com/video/play/loop-stitch-english

(Sorry, the video seems unwilling to appear in the post, just click the link…)

I’m not sure if one can cut the loops like in the picture above and not cause an irreparable damage to the knit work… Personally, I wouldn’t dare. But then, I’d never dare to cut steeks either…

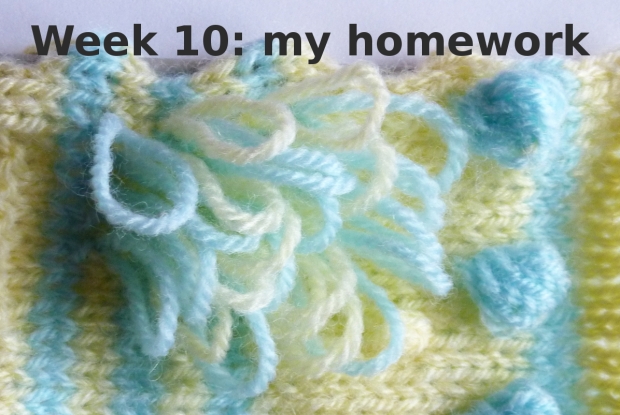
Homework! I cheated and made a very small loopy patch – but even at such a small scale it gives you an idea of how a bigger piece would look.

w10-homework

Yes I know the picture is flipped onto its side!

My verdict: it’s a fun stitch and once you get the hang of it, it knits very quickly. Unfortunately, I’veĀ  found it to be somewhat unstable. If you pull the knitwork vigorously in all the directions the stitches that are supposed to secure the loops get loose – at least this is my own experience.

If you are not afraid of ending up with a herd of runaway loops, here’s a vintage pattern for you: a tea cosy from knitting-and.com

Good knitting and see you next week!